Tuesday, December 8, 2009

Melacca Love Story (a photo shoot in historical town Melacca)


This photo shoot was done sometime early November during my trip back to Malaysia. I haven't been back in 3 years and this time round, my family took the oppurtunity to visit Penang, Singapore, Melacca and we'll be going to Kuching on our final leg. This shoot was done in Melacca on the course of a Sunday morning. A big thank you to Jess for being so enthusiastic. She started having her make up done from 5 a.m in the morning. I was myself on location by 6.30 am. By brother was unluckily dragged into the whole equation by becoming the driver and light assistant for the morning. We started getting first light by around 7 am. We started the shoot in the Stayuds ground. We had to move fast as the first tourist bus, unbelievably arrived around 8 am. It was not possible to shoot here at any other time of the day as the place would be packed full of tourists so we had about 1 hour to grab as many shoot here as possible.


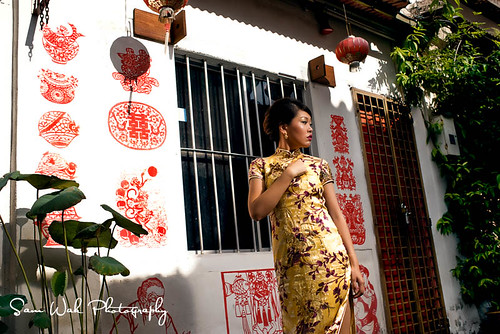
We then moved to Jonker's Walk. This charming street is full of old houses of an era gone by. It was perfect for the kind of shoot I was going for. But the traffic in this place got busy pretty quick. We then moved to the street behind Jonker's Walk which I think was a better location for shoots. We spent the rest of the morning here, moving from one interesting location to another. I'd say, my overall feeling is that Melacca as a whole a friendly place to photographers. I didn't get any hassle all morning which makes the overall experience a pleasant one. This is my first time in Melacca. Let me tell you photographers, this town is cheap, relaxed, charming and an incredible spot for a photo day out. Highly recommended. We're even thinking about relocating here permanently. :-)


Light setup has been primarily natural light. Getting the model to step in and out of the shade to feather the lighting. When we did use flash, it was usually either a single bare flash for fill or using a speedlight pro kit modifier during the earlier part of the day. No reflector though it would have been handy for light fills but we continue shooting in the shade to prevent any high contrast lighting. I was travelling light so my gear was limited to a sony HVL F58am flash, Nikon sb28, a sony a900, a Minolta 35mm f2 and CZ 85mm f1.4, skyport triggers, a Honl grid and snoot, a speedlight pro kit and a manofrotto nano light stand. This is a relatively light setup compared to what I normally take with me to a shoot and seems to work quite well when shooting in the tropical light. But then that depends on what you're looking to shoot really. I find the 35mm a little narrow and sometimes wonder if a 28mm prime would have suited me better in this trip.


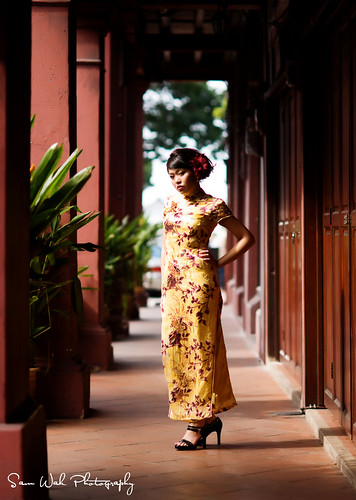
Some of the buildings in Melacca were full of rich colours like the above corridor next to the Stadthuys. These make for ideal shoot locations.


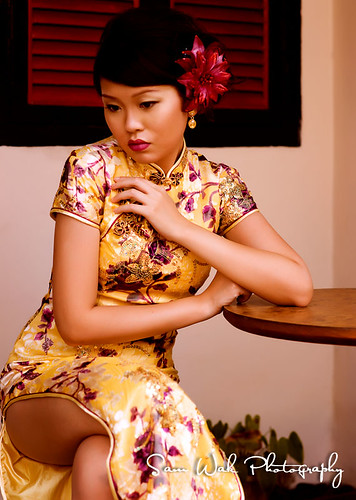
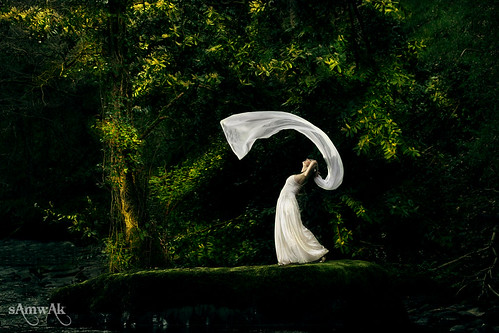
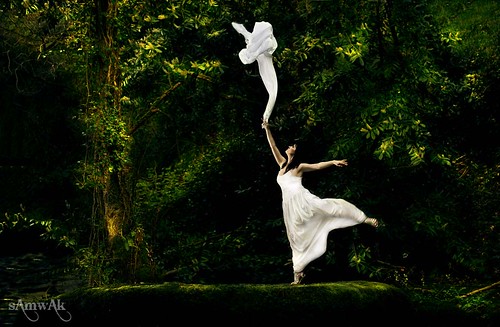
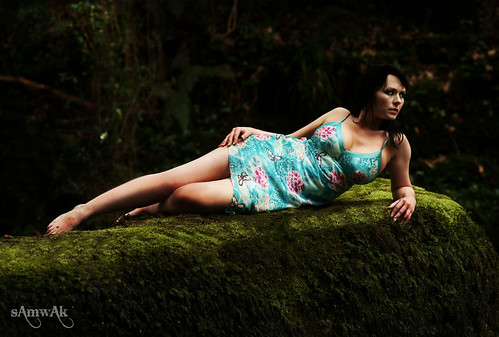
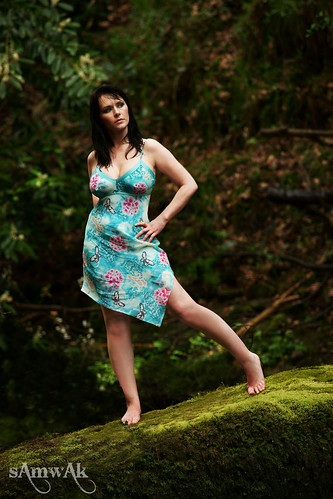
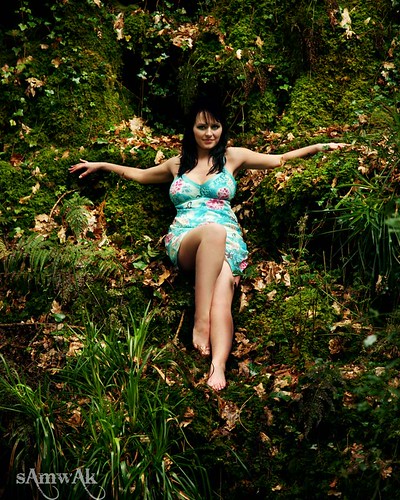
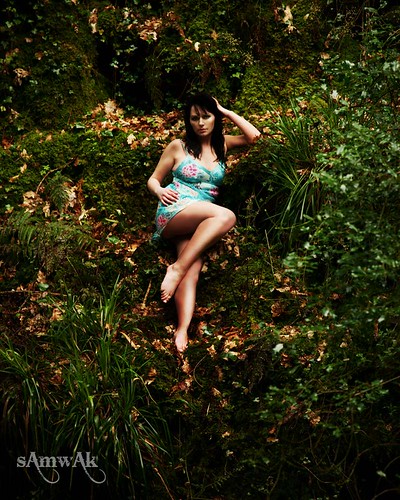
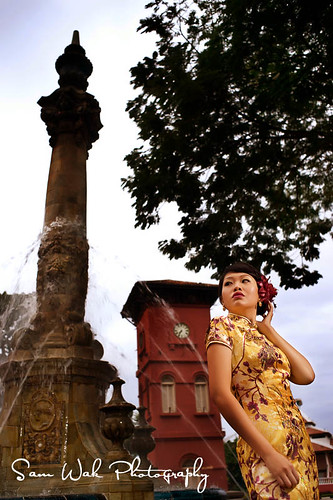
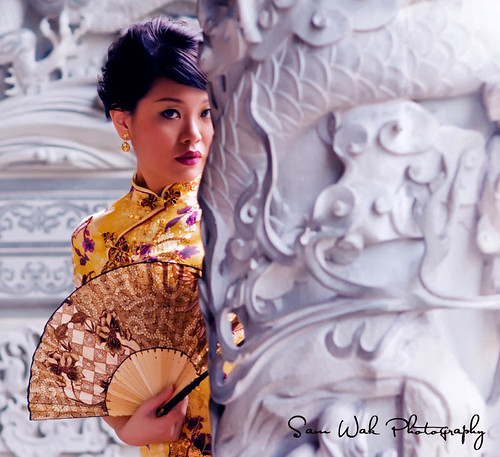
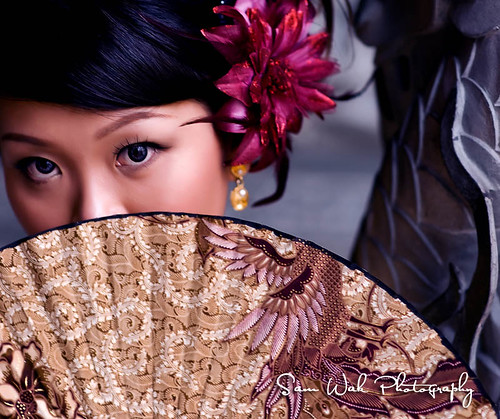
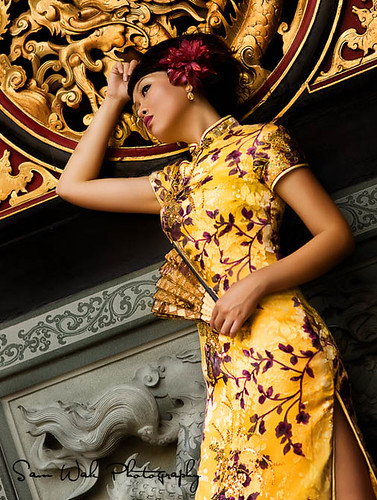
We had rented the dress from a local bridal shop. They also did the make up and hair for us. I bought the fan from Jonker Street.


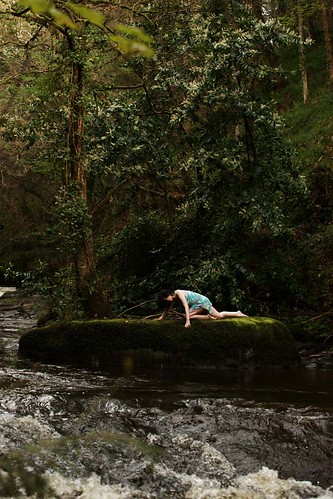
I was shooting a mix style of classical portraits and lastly, action shots like those of a movie scene. It was fun trying different ideas. Somehow the whole thing unfolded in my mind like a old school romantic chinese movie. Hence the name of the set.


If you were ever in Malaysia, Melacca is definitely well worth a visit.

Thanks for watching. Hope you like it. The full set can be found here.


Big thank you to Jessi who as of writing appears to be the only model from Melacca registered on model mayhem.

Friday, November 13, 2009

A grand wedding in Adare


I recently shot a wedding in Adare for the second time. I shot my first ever wedding as a second shooter in Adare in fact. This time round it was the wedding of Darragh and Fiona. The wedding was in Adare church and the reception in Adare Manor itself.

Adare is a popular location for weddings. The village itself is picturesque. I've seen some shots of couples here and there are frequently taken at the Public Park and the Abbey. Both locations are nice but it's just not very original as locations. So myself and my second shooter scouted the location, explored potential ideas. Try to see things little differently. While our ideas are not completely original, but I think it was adapted well to location.


I must say I was blessed with the fact that Fiona and Darragh were a good looking couple and have no problem posing for the camera. It certainly makes life very easy. A check out her dress, very sex in the city, just pure class.

We didn't do too many strobist style shooting here as we didn't have much time to play with lights. The ambient light in the location was perfect for dramatic lightings. Check out the images , I'm sure you'll agree with me.

Almost got sabotaged by the door man in the above image. The door was initially open, I had manually metered with the door open. Then without warning, he closed the door and boy did the light in the church drop by at least a stop and a half. I was rather worried this wasn't going to expose properly but it turned out great.

What a beautiful couple. Totally relaxed in front of the camera and the pictures show.
I'll link to the full album when it's ready to go. For more information about my wedding services, please check http://www.wakphotography.com/. Thanks for reading.

Saturday, May 2, 2009

The Delivery Man and his flying dog

This here is another sunny day shoot. I like blue skies and white fluffy clouds, I do. As a child, I must have spent many a bored afternoon daydreaming as I watched the clouds and imagine myself floating thru the clouds, carefree. lalalala

This shoot aimed to capture that feeling. I know a man, known simply as 'The Delivery Man'. You call on this guy when you have something important to deliver, and deliver it he will. Interestingly enough, he also has a Flying Bassett. A wilful yet incredible sweet dog, who is mostly a pain in the hole during the shoot.

We started the day doing a few cross lighting with the delivery man against a clear blue sky.


As before, the thing to do here is expose for ambient until the sky looks acceptably blue and the clouds not over exposed. The limitation with a lot of camera and with the sony a900 is that the max sync speed is 1/250th of a second. So you have to decrease aperature size instead to control ambient light. This however also limits the amount of light hitting your sensor from your camera flash. Even at full power, I had to use two camera flash at 6 feet, firing bare to fill the shadows.


Ok ok, the backdrop were composites of clouds from that day. I couldn't find a high enough place to clear the horizon. So I had to try and get rid of the trees and other what have you's from the image in photoshop. I was really upset!

The image below was tough enough to shoot. I mean this fella could really jump. How do you frame a 6 feet tall fella who can jump 20 feet in the air. On top of it all, you're shooting at 1/250th of a second, potential this will still cause blurring. I find if you wait for the fella to reach the apex of his jump ( ie where he is almost at a stand still for a fraction of a second), the image will be the sharpest.

Now the flying Basset on the other hand has a short attention span. One thing I've learn from this shoot is unless your dog understands at least 2 commands, sit and stay, you have no hope of getting any proper shooting done for the day. For a dog with short attention span, you need a trainer or somebody who has control over the dog to stop the mutt from running around chasing other bitches or kids. Above all, you need to bring doggy treats to hold its attention and a towel to clean off the damn slobber. Failing that, you do a composite and I'm not admiting to that again.

In this instance, the dog got bored and flew away. That was the end of the shoot for the day.


The lighting setup was the same for all the shots. Lovely bare flash cross litted with the sun to camera right.

A big thank you to the Delivery Man. He models in his spare time and you can find his info on model mayhem. http://www.modelmayhem.com/570210

Thursday, April 30, 2009

Crosslighting on Bull Island

Just a quick post on a recent beach side shoot. My initial planned shoot for the day got a last minute cancellation so I invited Del and Dave to come along with me for some sunny day shoot on Bull Island. Shooting on the beach on a Sunday meant there were people everywhere. However, we manage to find ourselves a quiet spot, drew the occasional looks from passerbys. It was relatively undisturbed except for a bunch of teenage girls in the background who decided they needed to run their own photoshoot nearby the moment they spotted us.

The lighting plan for the afternoon was simple. Meter for sky to get a nice blue sky and then dial in the flash work to cross light

It was a 4pm sun so light isn't as harsh but nonetheless still required some power to overcome. I had to use 2 flash to crosslight with the sun. In some cases, it might just be too much power and the spread of light from 2 flash isn't even. Any overlap will naturally result in some hot spots. Diffuse light in this case would be good but the strong gust of wind makes difficult to set up brollies. Maybe a stofen would be another option but I was more concerned about getting some power to overcome the sun. I am currently seriously considering dusting the AB800 alien bee unit at home and getting a portable power pack for it so I can do more bright daylight shoot.

Here are a few examples of the shoot we did for the day.

2 sb28s to camera right, cross lighting with sun to camera left.


This was the original idea. A little kooky but not many of them shots worked out. Again, crosslighting.
Picture of strobists in the wild. Spot the annoying rival shooters in the background. They were quite persistent.

Just a few tips:
- The locals will know, there's hardly any warm weather in this country. Sometimes we're lucky, but never on the day you want to shoot. Consequently, expect your models to be cold. Always advice them to bring a long coat or something extra to keep them warm in between shoot. I usually shoot for 10 min at a time and then the models warm up for 15 min. Tedious process and cuts your shooting time by half. But them's the brakes if you're working alone. On big production shoots, ya get some assistants and probably bring along a portable heater. I get winded carrying my camera gear just climbing the slopes of Hellfire woods, never mind a portable heater.
- Models tend to frown in cold weather. Well, not at the photographer I hope (while secretly cursing them for dragging them out into the cold), but as a reflex reaction towards the cold. That makes them look quite cross in photos. Keep an eye out for this. Probably have to tell them to go for a neutral expression or figure an acceptable frown and clone it out later in PS.
- Find a natural wind barrier. The shoot got slightly easier later when we shot behind a sand dune. This will probably help if ya need to kill some ambient light ( provided the sun is on the other side of course) and you don't need to expose for the sky.
Okie dokie, that's it for now.

Oh yeah, here's the article on strobist about crosslighting.

Tuesday, April 28, 2009

Dublin Strobist Meet

Last Sunday Del and I organised the Dublin Strobist monthly meet. This time we decided to use the Fast and Furious movie as the theme for the get together. I had organised 5 cars , 7 models and 3 MUAs for the shoot. I must say I was excited. It turned out, I didn't shoot much for the day at all. Spent most of my time running around seeing how everyone was doing.


The weather, was not perfect. It was however reasonable by Irish standards anyway. At least we got a few hours outdoors. But it threatened to rain all evening and there was certainly plenty of wind. Diffusing light out door was a challenge.


I'm going to post some pre and post processed photos for those of you who might be interested.

Gentlemen, start your engines.


Ghost Riders : The flash info for these are obvious enough


Bare flashes to camera right and left. Post processing in this one, I decided to go for a high contrast gritty look. But that kind of finishing really brought on all the blemishes on the skin. I spent a long time working on the skin and I'm still not 100% satisfied with it.


Another cross lighting. At least somebody helped me hold an umbrella so manage to get some diffuse lighting to camera right. Gone for a softer finish on the post processing here. That light patch on the right eye was a bitch to get rid off.
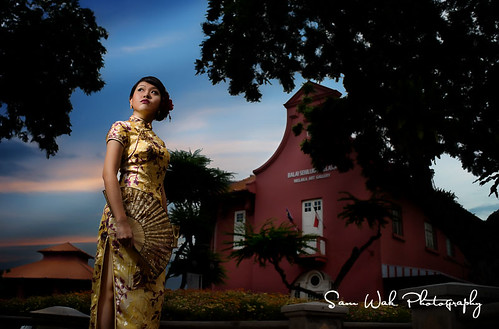
2 flashes at camera left, front and back of model at 45 degrees, both fired bare.


In some cases I wish I had more time to look out for light spill etc. Awkward nasty ones usually mean hours spent on removing them. Time wasters.

It was a cold day so spent quite some time removing goosebumps and awkward coloured skin. Cold weather, not good for many things unless a person intends to capture goosebumps at the first place.

Monday, April 20, 2009

Tommys Gucci M3

First of all, big thank you to Kevoto for assisting. Without him, I would have cracked up half way thru this shoot which I found to be rather tough. Big thanks to Climberhunt for sorting out the security people.

This is the first time where I had to shoot the car as the primary subject. When shooting in the dark, you need lots of diffuse light or the lighting won't be great. Bare flash just won't do it, you'll get patchy light.The trick is lots and lots of diffuse light. I find myself frequently underpowered, and that's working with 6 flashes, Shooting various accessories on the car is also a challenge because the shape of the accessories change constantly and the surface varies too. Good challenge. Learnt a tremendous amount in just 3 hours.


Light setup above is one brolly to left, one soft box to right, one flash shooting onto ceiling, one flash to rear of car for separation.

Setup above: One brolly to left, one to right, one to rear for separation, one bare flash just behind wheel.


2 brolly right and left of car, one flash aimed onto ceiling.


It's been nicknamed the Gucci M3 for a good reason.


One brolly to right, one bare flash behind wheel.


The above is one brolly to camera right, one bare flash on ground.
The above is one strip light directly above carbon grill.
Same setup as before except the flash bounced onto the ceiling was gelled CTO.

Wednesday, April 15, 2009

Kira at Glen Clare

Welcome to my photoblog. This here is my first post.

I just want to say a big thank you to Kira (Raveness) for travelling to Limerick from Cork for this shoot. It's been a pleasure meeting her. Very nice person and a fantastic model to work with. Highly recommended.

http://www.modelmayhem.com/714678

This is one of those shoots that just evolved and evolved by the hour. That's because I had no idea what kind of shoot I wanted to do with Kira until we got to the location. Never worked with her before and no idea what her wardrobe would be like or how she'd look in person. I'm rather sceptical of portfolio pics these days.

This was our first time visiting Glen Clare. As I didn't want to keep Kira waiting, I had to make snap decisions on locations as well as clothes to wear. So whenever ideas pop into the head, we just rolled with it. She's a class model and she made life real easy for me. When I found out she did ballet for a while, I couldn't be more pleased. Hence the ballet type poses in some of the shots.

She had this 'can do' attitude about her too. So when I asked her to cross the river, climb a slippery slope, stay out in the rain for 2 hours, she did it all. What a trooper!

Below are some of the shoots we did.

The ballet session.

There's actually a knack to throwing them fabrics. You need to fold them a certain way so when you throw them in the air, they unravel. The fabric we used was a cheap curtain liner.


Earlier, I had decided to go for some darker themes. I kept thinking witches for this.


After the fabric / ballet shoot, it started to rain. I had two choices. One wrap up and go home or two, bring out the bin liner and start covering all the gear. I went for the later.

The alien looking lighting device below is a nikon sb 28 flash covered by a bin liner with a hole in it. The flash fired thru that hole and the bin liner was velcro'd to the flash. My camera was under another bin liner and the other flash also had the same setup. One thing I've learned is that tripods are better than lightstands when you setup in uneven terrain due to the fact that you can adjust the length of the tripod legs.


I was going for a drenched look so we continue to shoot in the rain.


However, I learnt from this shoot that even with drenched look, there's probably a secret or technique to make them look good even when wet.

1st, you probably need a model with thick head of hair. Failing that, ya just have to 'burn' the hair in post processing.

2nd, drenched hair doesn't equal untidy hair. Ya still have to make it tidy. Should have asked Kira to take her hair brush with her when she crossed the river.

3rd. All manner of debris will stick to your skin when wet. Best to just wipe em off on site and save yourself a lot of touch up time afterwards.

As for make up, you probably still need it but don't ask me what the industry people do because I have no idea. If you have any tips, let me know.

Then I spot the luscious green slope that would make for a great back drop. I suggested to Kira she climbed it and off she went.


And here's Kira totally exhausted from the shoot.


The rest of the set is here:
http://www.flickr.com/photos/krispy_rabbit/sets/72157616689162259/

Thanks for reading.